Tuesday, 1 February 2022

A 3D Part of a Plant ActivityA 3D Plant Part Craft: Engaging Nature's Wonders with Imagination

In the world of learning, nothing compares to the magic of hands-on activities. A delightful and enlightening journey awaits as we delve into a simple yet engaging 3D plant part craft activity that will spark curiosity and nurture young minds. Before embarking on this adventure, take a moment to sow the seeds of wonder by planting a seed and witnessing its transformation into a magnificent flower. Observing this remarkable journey will pave the way for identifying the various parts of a plant and their roles in the grand symphony of growth.

Gather these readily available materials:
a) Seeds (pawpaw seeds were used in our exploration)
b) Brown, green, and blue Manilla papers or paint of similar hues.
c) Brown construction/flour paper (alternatively, employ brown thread)
d) Paintbrushes
e) 4 cupcake liners
f) Glue or tape
g) Scissors
h) Marker pen

Let's embark on the creation:
Begin by painting the lower quarter of a plain white paper brown, and the rest blue. Allow the paint to dry. For a time-saving approach, colored papers can represent the sky, grass, and leaves, while construction/flour paper can depict soil and roots. Now, glue a green craft/painted paper strip onto the blue paper to form the stem. 
Next, fold the cupcake liners and artfully arrange them in a circular pattern at the top of the stem. Nestle the pawpaw seeds gracefully at the center of the cupcake liners. Cut two leaf-shaped papers and strategically glue them onto the stem at different points.

For the roots, cut the brown construction/flour paper into thin strips, gently crumpling them to mimic the appearance of real roots. Alternatively, brown threads can also fulfill this role. Just above the brown section, place a strip of green-colored paper to represent the grass. Make a continuous cut halfway into the strip to give the illusion of lush grass.
Finally, fashion five rectangular papers and label them "flower," "seeds," "leaves," "stem," and "roots." Clearly affix each piece to the craft, marking the parts of a plant, as exemplified in the image above.

Through this imaginative journey, your child will: 
• Identify the various parts of a plant. 
• Craft different plant parts inspired by their natural surroundings. 
• Develop a keen interest in plant anatomy for both learning and delight.

This delightful activity also fosters competencies such as communication and collaboration, as children work together in groups. Their imagination and creativity will shine as they personalize their crafts, while assimilating new knowledge and applying it to diverse yet interconnected contexts.

As you embark on this creative endeavor, embrace the joys and challenges it brings. Share your experiences, the benefits you observe, and any clarifications you may need in the chat comments. Together, let's nurture the blossoming minds of the next generation, as they connect with the wonders of nature and the marvels of learning.

Monday, 24 January 2022

Creating Your Own Respiratory System Model

See previous article on how to make homemade modelling clay https://hands-on-kids-activities.blogspot.com/2022/01/home-made-modelling-clay.html

Have you ever wondered how our cells get the oxygen they need? It's all thanks to the remarkable respiratory system, which plays a vital role in delivering oxygen to our blood. Now, imagine being able to see how this incredible system works right in front of your eyes! With a fun and educational activity, children can make their very own respiratory system model using homemade modeling clay.

By engaging in this hands-on project, children not only learn about the essential organs involved in breathing but also gain a deeper understanding of their functions and how they all come together to keep us alive and healthy.


Let's take inspiration from the experience of my 14-year-old niece, who was struggling to grasp the complexities of the respiratory system in her Form 1 class. To help her overcome this challenge, she decided to create her own respiratory system model. Little did she know that this creative endeavor would prove to be an eye-opening and enlightening experience. 

As she carefully molded the different organs of the respiratory system using colorful homemade modeling clay, she started to visualize how each organ fits and interacts with the others. The magic happened when she observed her handcrafted model in action. She could see how air moves in and out of the lungs, and suddenly, everything clicked into place.

With her homemade respiratory system model, my niece discovered an exciting way to learn. Each labeled organ became a gateway to understanding its unique function. The model transformed her understanding of breathing from an abstract concept to a concrete and tangible reality. 

To create your own respiratory system model, you'll need some easily accessible materials. Grab some assorted colors of homemade modeling clay and prepare a carton box, printing paper, markers, glue, scissors, and optional blank labels.

Begin by tracing the outline of a human head to the shoulder level on the printing paper or Manila paper. Next, let your creativity flow as you knead and shape the clay into the different organs of the respiratory system. Don't forget to label each structure accordingly for a complete learning experience.

Through this hands-on activity, children can explore the wonders of the respiratory system in a fun and interactive way. As they manipulate the clay and bring the model to life, they'll gain invaluable insights into how our bodies breathe and absorb oxygen to support life. 

So, if you're curious about the remarkable workings of your own respiratory system, why not embark on this educational journey? Making your very own respiratory system model is not only a fantastic learning experience but also a testament to the power of creativity in education. Let your imagination soar as you dive into the world of the human body and discover the marvels of the respiratory system.


Respiratory System

Monday, 17 January 2022

Crafting a Homemade Digestive System Model with Modeling Clay

See previous article on how to make homemade modeling clay https://hands-on-kids-activities.blogspot.com/2022/01/home-made-modelling-clay.html

Want to ignite a child's curiosity and make learning captivating? Look no further than modeling or simulating real-life objects. When my Grade 3 child struggled to grasp the complexities of the digestive system, we embarked on a fascinating journey of creating her own digestive system model using homemade clay. With enthusiasm and determination, she spent her afternoon meticulously crafting this educational masterpiece.

To bring her vision to life, we gathered the following materials:

• Assorted colors of homemade modeling clay

• A carton box

• Printing paper or Manila paper

• Mark pen or pencil

• Glue

• Scissors

• Printed blank labels (optional)


First, we traced the outline of a human body structure on the printing paper or Manila paper, capturing the region from the head to the hip area. With skillful hands, she kneaded and molded the clay into different shapes, precisely replicating the organs of the digestive system. Each structure was carefully labeled to ensure accuracy.

First, we traced the outline of a human body structure on the printing paper or Manila paper, capturing the region from the head to the hip area. With skillful hands, she kneaded and molded the clay into different shapes, precisely replicating the organs of the digestive system. Each structure was carefully labeled to ensure accuracy.
The objective of this hands-on activity was twofold: to create an accurate digestive system model using easily available materials and to simplify the complex process of digestion. Through this engaging process, she not only identified each organ and its location but also explained its function and the overall process of digestion. Click on https://www.instagram.com/p/CvXMO64Ajlt/ to hear her eloquently describing the journey of food through the digestive system.

Listening to her explanation, you might notice a few initial misconceptions. However, with dedication and learning from her mistakes, she confidently presented and shared her knowledge with her classmates. The process of creating the digestive system model not only fostered a deeper understanding but also instilled a sense of accomplishment and pride in her newfound expertise.

Crafting this homemade model of the digestive system proved to be an exceptional educational tool, combining creativity, hands-on learning, and effective communication skills. It provided an immersive experience that transcended traditional classroom teaching, igniting a spark of curiosity and making the learning process truly enjoyable.

As a parent, witnessing my child's enthusiasm and growth through this interactive project reaffirmed the value of creative learning experiences. The process of modeling the digestive system using simple materials not only deepened her knowledge but also sparked her interest in exploring other scientific concepts in a similarly engaging manner.

This endeavor highlights the power of interactive learning and demonstrates how homemade educational resources can effectively supplement traditional teaching methods. By creating a tangible and visually engaging model, we empowered our child to grasp complex concepts with ease and enthusiasm.

So, if you're looking to make learning enthralling and impactful, why not embark on a creative journey with your child? The possibilities are endless, and the rewards are immeasurable. With a little imagination, some homemade clay, and a dash of curiosity, you can unlock a world of learning opportunities for your young explorer.


Wednesday, 5 January 2022

Creative Fun at Home: DIY Modeling Clay - Engaging Kids in Colorful Creations

When indulging in arts and crafts at home, we faced the challenge of limited modelling clay availability. To overcome this, we devised a fantastic idea of making our own at home—a fun process where the kids can mix colors and create a rainbow set of dough, molding it into various shapes, letters, and numbers.

Using modeling clay has proven to be an excellent way to keep the kids entertained and engaged on technology-free weekends. The act of making, hitting, pounding, kneading, and rolling the clay brings a sense of relaxation, even for me as I squeeze and stretch it with my hands.


Beyond the fun, playing with modeling clay has numerous benefits, particularly in terms of play-based learning and skill development. It nurtures creativity, imagination, and collaboration, while also enhancing hand and finger muscles as the kids manipulate the clay to achieve desired shapes.

Note: the quantity of the ingredient(s) is not fixed and may vary depending on the type of product or the texture of the clay one wants to achieve.

Here's the simple recipe we used to make the clay:

Ingredient

  •  2 cups of flour
  •  1 cup Salt
  • 2 Table spoons of vegetable oil
  •  1 1/2 Cup of water
  • Assorted Food Color
  • Bowls
  • Pan/Sufuria
Steps
1.      Heat water, oil, and salt in a pan until warm.
2.     Divide the warm mixture into different bowls, depending on the colors you want to achieve.
3.     Add 3 to 4 drops or a pinch of food color to each bowl as desired.
4.     Gradually add flour to each bowl, kneading until the dough becomes smooth and non-sticky.
5.     Store the modeling clay in a Ziploc bag in the refrigerator for about 15 minutes or cover the bowl with cling film foil.
We experimented with primary colors—red, yellow, and blue—to create a wide range of colors. I took the kids through the color mixing wheel, broadening their imagination as they got messy mixing colors and forming various modeling clay creations.
(See the link for reference https://www.bforball.com/mixing-colors.php)
The homemade clay is safe for all ages and poses no harm if accidentally consumed.

Playing with this DIY modeling clay has been an enriching experience for the kids, sparking their creativity and fostering an appreciation for the wonders of colors and shapes. It's an educational and entertaining activity that we highly recommend for all families. For a glimpse of the fun, check out the links below to see the kids enjoying themselves, molding letters, shapes, and using shape cutters.


Monday, 13 December 2021

Creative DIY Educational Construction/Building Toy

This toolkit is truly amazing! It was love at first sight for my son. The well-organized compartments inside the wooden toolbox enhance his organizational skills as he carefully places the tools back after use.

This toolkit is truly amazing! It was love at first sight for my son. The well-organized compartments inside the wooden toolbox enhance his organizational skills as he carefully places the tools back after use.
The 34-piece set includes various tools and wood components, perfect for children aged 3 and above. 

The set consist of: slotted screwdriver, Philips screwdriver, hex wrench,  tiger pliers, hammer, wrench, saw, ruler, 5 different combination plates, nut, 2 different combination blocks, cross screws, wheels, hex screws and a variety of wood components. It is perfect for children aged 3 and above and is made of Eco-friendly material.

The decision to choose this building toy as a learning resource was driven by the remarkable benefits and skills it offers. It taps into a child's creativity and desire to construct diverse objects and shapes, fostering hand-eye coordination, logical thinking, problem-solving, and fine motor skills. 

Over time, I witnessed my son's self-confidence soar as he successfully built cars, planes, and structures from scratch. His understanding of colors, geometrical shapes, 3D forms, and counting improved while stacking the wooden pieces. A trip to the carpenter's workshop showcased his newfound knowledge as he confidently named various tools and demonstrated their functions in constructing objects and structures. The carpenter was delighted to let him participate by tightening some screws on a table. This building toy has proven to be an exceptional tool, instilling a sense of achievement and nurturing various skills in my son's development journey.

Resources:

See the video below the kids interacting with the Educational Construction/Building Toy

Monday, 15 November 2021

Unlocking the Power of Hands-On Learning: A Journey of Creativity and Growth in Early Childhood Education

As a mom who is deeply passionate about education, I have always believed that the key to nurturing young minds lies in engaging them with interactive and hands-on learning experiences. Over the years, I have witnessed firsthand how incorporating educational resource tools in early childhood education can truly transform the way children learn and develop essential skills.

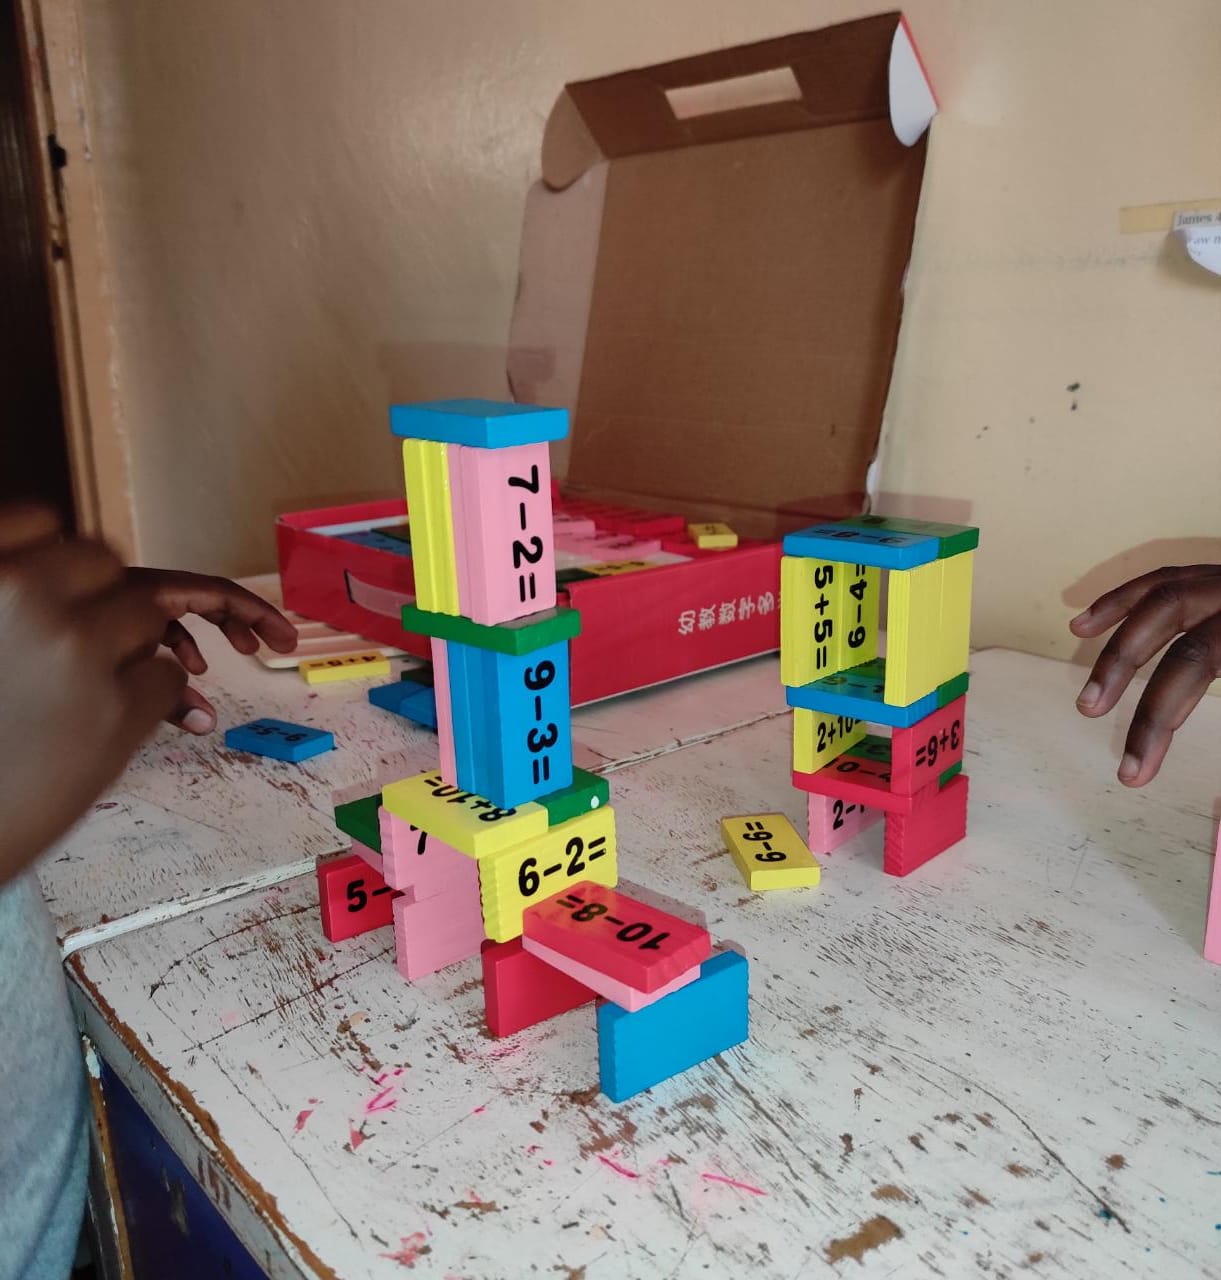
In my journey as an educator for my own children, one invaluable tool that stands out is the Preschool Mathematics Domino set. This simple yet effective resource has opened up a world of mathematical exploration for my kids. Watching them grasp basic mathematical concepts through play has been a joyous sight. From counting and pattern recognition to addition and subtraction, the domino set has become a gateway to the world of numbers, sparking their curiosity and building a strong foundation for future learning.


Another gem that I stumbled upon in this educational   adventure is the Magnetic Alphabet Kit. This colorful   and tactile tool has been a game-changer when it   comes to language development and literacy skills.   Observing my youngest struggling with reading, I   decided to take a hands-on approach. Through the   Magnetic Alphabet Kit, we embarked on a journey of   phonics and word building. As they manipulated the   letters, creating their own words and sentences, I saw   their confidence grow. With each passing day, their   vocabulary expanded, and their ability to read and   construct sentences improved significantly.
 
The benefits of incorporating hands-on educational tools extend far beyond academic achievements. One crucial aspect of interactive learning is the cultivation of creativity. When children engage their senses, exploring and experimenting, they tap into their innate creativity. The Magnetic Alphabet Kit, with its chunky soft-touch foam letters, provided an opportunity for my kids to not only learn the alphabet but also to express themselves through imaginative wordplay.

Critical thinking and problem-solving skills are equally vital for a child's development. As they play with these resources, children encounter challenges and puzzles that require them to think critically and find solutions. Whether it's figuring out the next domino piece or arranging letters to form meaningful words, they learn to analyze, strategize, and make decisions – skills that will serve them well in various aspects of life. The beauty of hands-on learning is that it seamlessly blends fun and education. Learning through play doesn't feel like a chore; instead, it becomes an adventure filled with curiosity and excitement. As my children actively participated in their learning journey, they retained knowledge better and developed a genuine love for exploration and discovery.

In conclusion, early childhood education enriched with hands-on educational resource tools has proven to be a potent combination for fostering creativity, critical thinking, and problem-solving skills. The interactive nature of these tools ignites a passion for learning, enabling children to thrive in a nurturing environment.In the words of Benjamin Franklin, "Tell me, and I forget. Teach me, and I may remember. Involve me, and I learn." As parents and educators, let us embrace the power of hands-on learning, immersing our children in a world of possibilities, where their imaginations take flight, and their minds grow stronger with every touch, turn, and twist of these remarkable educational resources. Together, let us shape a future where learning is a joyful and empowering journey for every young mind.

To read the next educational resource tool click on this link https://hands-on-kids-activities.blogspot.com/2021/12/creative-diy-educational.html


Resources:
See a video below to view the kids interacting with the kit

Monday, 25 October 2021

Early Childhood Educational Resources for Homeschooling

The year 2020 brought with it a whirlwind of unforeseen challenges, among them the sudden shift to homeschooling due to the pandemic. As a parent, navigating this uncharted territory proved to be both daunting and rewarding. With my kids at home and my own work responsibilities to attend to, the task of striking a balance between work and ensuring my children's education did not falter felt like a tightrope walk. However, amidst the uncertainties, I discovered a treasure trove of innovative educational resources that kept my kids engaged, curious, and excited about learning. In this article, I share my homeschooling journey, reflecting on the challenges I faced and the creative solutions we embraced to nurture our children's intellectual growth. One particular gem in our educational arsenal was the Preschool Mathematics Domino—a versatile tool that not only sharpened their mathematical skills but also fostered problem-solving and critical thinking abilities.

The sudden shift to homeschooling was uncharted territory for our family. As the pandemic confined us to the four walls of our home, my kids' education was my top priority. Yet, I soon discovered that traditional pen and paper activities were met with dwindling interest and enthusiasm. The need for an alternative approach became evident, and I embarked on a quest to explore innovative educational resources that could capture their imagination and foster a love for learning.

My search led me to the Preschool Mathematics Domino—a vibrant and eco-friendly educational kit designed for children aged three and above. With 110 colorful wooden pieces and a numbered board, this captivating tool promised to enhance their mathematical skills through playful exploration. 
The kit offered a multitude of math problems, encouraging the kids to add and subtract two single-digit numbers and place the dominoes strategically on the board.
What I truly admired about the Preschool Mathematics Domino was its versatility in promoting hands-on and creative learning experiences. 

The kids embarked on exciting adventures, using the counting sticks and wooden pieces to design imaginative shapes and structures. Their creative minds soared as they competed to construct the tallest and sturdiest tower, fostering teamwork and collaboration.

In one of the most cherished activities, we coined it the "domino wheel." Inspired by an image on the mathematics domino storage box, the kids took on the challenge of replicating a circular structure using the domino pieces. This task proved to be both fun and challenging, enhancing their motor skills and problem-solving abilities. With each collapse and rebuild, their determination to succeed and improve their design shone through, resulting in moments filled with laughter and delight.


As the kids delved deeper into the world of Preschool Mathematics Domino, I witnessed a remarkable transformation in their approach to problem-solving. Evaluating whether to add or subtract, calculating the right equation, and deciding on the ideal slot for the domino demanded critical thinking at its finest. Their young minds embraced the thrill of challenge, unearthing solutions with newfound confidence. The process of learning became an exhilarating adventure, and they embraced each math problem as an exciting puzzle to solve.

An additional activity they engaged in was designing a domino wheel; as we nicknamed it. They observed an image printed on the mathematics domino storage box and then mimicked it to achieve a circular structured design. This challenging task enhanced the kids’ motor skills every time they built it up after collapsing. It is an exciting and fun activity full of laughter.

To all fellow parents embarking on the homeschooling adventure, I wholeheartedly encourage you to explore alternative educational resources that ignite the spark of curiosity in your children. Embrace the world of hands-on learning, where imagination knows no bounds, and creativity takes flight. Let's create an environment where problem-solving and critical thinking are celebrated, and each challenge is an opportunity for growth.


To continue this journey of discovery, I invite you to explore the next educational resource that enriched our homeschooling experience. Click on the link to uncover a treasure trove of innovative tools that will keep your kids engaged, curious, and inspired in their quest for knowledge. Let's nurture young minds together and embark on an exciting learning adventure that transcends the boundaries of traditional education.

Resources:

See a link to view the kids solving the sums:

                      Subtraction                                           Addition  

See a link to view the kids playing the Domino Wheel


On to the next article ...
https://hands-on-kids-activities.blogspot.com/2021/05/as-mom-who-is-passionate-about.html

Cracking the Reading Code: What Teachers Can Learn from The Reading Mind

I’ve always been fascinated by that “aha!” moment when a child finally cracks the reading code. One day, they are staring at letters like th...